I have long collected miniatures. Often for use in role playing games. Many of those figures often belong to specific game lines though.
One of my friends bugged me enoug th actually get me into playing. It wasn't hard as several other friends were actively playing Warmachine and Hordes.
My main faction is the angry elves, the Retribution of Scyrah. I like the different design of the models, the high-tech feel of the elves and in some ways, they do remind me of the Eldar, who I also like.
Mind you, my record in playing them is quite terrible but that's about 90% my fault. I tend to have issues with order of activation and not focusing enough on the inherent synergy in some of the models.
But I am getting better.
As I specifically go out to actually play the game now, I've been shopping from a few stores and thought I'd throw out some quite notes:
Advanced Deployment: They are the makers of all things acrylic for numerous games including War Machine and Hordes. My first order with them was slow and missing some pieces. When I say it was slow, I ordered some different things from about five companies at once and these guys were the second to last to ship out my goods. Mind you, that might not always be true in the future.
They're also not fantastic at communication. They didn't pack some stuff that was supposed to come with the level of order I placed and didn't reply to initial efforts. I made another order, as I was pleased with the quality, and noted that if they didn't including the missing goods, they could cancel this order, and I'd talk to my credit card company about the missing stuff.
Strangely enough that worked and that order came very quickly. So fast that all in all, I've ordered from them three times and for the templates and other stuff that they provide, I'd recommend them.
Discount Games Inc: One of my friends hooked me up to these guys. Usually about 30% off, have a fair selection of goods, including bases from Secret Weapon and CoolMiniOrNot and good turn around time on their orders with free shipping at $50. One nice thing? They also sell stuff from Broken Egg Games So if you get that free shipping, beats ordering directly from Broken Egg.
The free shipping and discount make them a better buy in many ways that my old stand by for online ordering, which is...
Miniature Market: A very good selection, a lot of different things in the warehouse, and often a lot of sales. Free shipping on orders of $100 or more. Very good customer service and very quick to get back to you.
FRPGames: On the outside of stores I normally shop at because they don't offer free shipping and as a matter of fact, the more you buy the more expensive the shipping gets, I still shop here because they do a lot of sales. Sometimes 50% off, sometimes more. They also carry a ton of stuff.
Noble Knight Games: I've been collecting miniatures so long that some of the sets I have, I had before they were sold in the now standard 10 man units. When I finally got into the gaming aspect of it, some units were very hard to hunt down and I thought it might be possible I'd have to just buy whole new units as the prices of the individual pieces I needed was almost what a full unit with discount cost. These guys have great selection and my experiences with them have been good.
So where does everyone else shop? Have I missed any of the obvious places? Any places people should avoid in general? Have your experiences been different than mine?
Saturday, September 19, 2015

Thursday, April 9, 2015
Hero Forge Custom Miniature Review
Hero Forge Custom Miniature, found here: https://www.heroforge.com/ , is a company that allows you to create a miniature based on a series of selections and have said miniature mailed to you. The scale is approximately 30mm.
The fun part about the website, is that it allows you to customize your character. You can select from a variety of different parts of the character including head, hair, eyes, teeth, body type, clothes, weapons, accessories, and more. This allows for a high level of uniqueness.
There are limitations though. For example, the last time I played with the site, I could not create a character with a sword pointing down to the ground. In this picture, taken from the blog Minismith's Minis for Ebay, http://minismithebay.blogspot.com/2010/11/ral-partha-wizard-female-ogryn-and-2.html, an old Ral Partha miniature, something like Wizard with Runesword, the figure is pretty much exactly what I would like to make but in a more modern scale. Not possible.

As far as I can tell, you cannot have a character that wields a weapon with two hands either. This leads to some odd poses with characters that are yielding say, greatswords.
The current races are also 'mainstream' in that you have the following: human, elf, half elf, dwarf, gnome, halfling, half orc. The good news is that they also have the following: elemental (gensai), half-demon (tielfling/cambion), and robot (warforged). Sadly, no half dragons or half giants. You can cheat on the later thought as you can control the size of the character to a certain extent.
One aspect that is far ahead of most others, is that while fantasy may be the most popular, it does include settings for the following genres: fantasy, western, sci-fi, modern, east Asian. This allows you to cover a wide swath of characters that outside of boutique companies, are rarely covered.
My friend ordered several of these. Some of them directly for character's he's playing in a Dungeons and Dragons 5th edition campaign and others because he thought the ability to mod your figure awesome.
The miniatures were well packed and arrived sound and secure in a box with bubble wrap. Each figure was individual wrapped and no figures suffered damage in the transit.
In terms of the size compared to other companies?


In the first, we have a dwarf from Stonehaven miniatures next to an elf from Hero Forge.
In the second, we have a crouching human next to a miniature from Wyrd, an old metal Guild Captain.
Here are my observations from painting several of them:
1. Size is fairly close to standard in the industry. As much as there is a standard.
2. Detail is soft. I'd say somewhere around a fair Mage Knight or other prepainted miniature. The more control you have over your brush, the more you'll be able to bring out those details. Some of that detail is so soft though, that you will not be doing things like drybrushing unless you have fantastic control. The same is true for washes. Without deep recesses, the wash has nowhere to go. Note this varies depending on the model. In the below, the tabards don't necessarily have a lot of detail. The cloaks have enough to make it easier with washes, layering or drybrushing.

3. Printing Artifacts: If you were to hold one of the figures and look at it under a strong light, you would see the remanents of how the pieces are created. This looks like waved texture. It's so slight though that it does not show up when brushed. Some may want to file it but that seems a bit extreme.
4. Fragile to a point. I have several miniatures from Gale Force 9 for their Dungeons and Dragons line. Perhaps due to how the dynamic poses are set, I've broken a few of them. I dropped a knight from my friend's order and snapped the blade right off. The good news is that it was a clean break and easy to repair with super glue. Now mind you, that would probably happen with metal as well. Handle with the same care you do resin figures and you should be okay.
5. Paint Adhesion: I tended to use two spray coats of Army Painter. I started with black and then over the knights, plate mail. On the wizard and warrior, I did a zenith primer of white over the black. Despite that, there were several spots on the miniature that did not take paint easily. Note this was after I washed them in warm soapy water and used a toothbrush to scrub them.


The initial offering is strong. The biggest hurdle for casual users like myself, is price. At $25 a figure, these miniatures are directly competing with top tier brands on a per figure. On something inexpensive like Bones or a set of plastic? If you have a specific figure you want created, such as my friend did with a duelist with two rapiers and a crown, the price is worth it.

Is you just want something to paint? There are a lot of options at that price point.
As Hero Forge expands it's utility, not even necessarily in terms of detail, but in terms of variety, the value will increase. For example, if there comes a point where you can select from twenty different historical styled helmets or different types of clothing representing specific eras, people will pay more for that.
As more options in the positioning of the figures is increased, people may find something that gives them a better match. The ability to have a miniature using a two-handed axe in two hands for example.
The more specific your character need, the more specific the miniature you want, the stronger the appeal of Hero Forge.
Keep an eye out on them. It won't be long before I suspect Hero Forge will make it's money selling you the CAD's for printing at home.
The fun part about the website, is that it allows you to customize your character. You can select from a variety of different parts of the character including head, hair, eyes, teeth, body type, clothes, weapons, accessories, and more. This allows for a high level of uniqueness.
There are limitations though. For example, the last time I played with the site, I could not create a character with a sword pointing down to the ground. In this picture, taken from the blog Minismith's Minis for Ebay, http://minismithebay.blogspot.com/2010/11/ral-partha-wizard-female-ogryn-and-2.html, an old Ral Partha miniature, something like Wizard with Runesword, the figure is pretty much exactly what I would like to make but in a more modern scale. Not possible.
As far as I can tell, you cannot have a character that wields a weapon with two hands either. This leads to some odd poses with characters that are yielding say, greatswords.
The current races are also 'mainstream' in that you have the following: human, elf, half elf, dwarf, gnome, halfling, half orc. The good news is that they also have the following: elemental (gensai), half-demon (tielfling/cambion), and robot (warforged). Sadly, no half dragons or half giants. You can cheat on the later thought as you can control the size of the character to a certain extent.
One aspect that is far ahead of most others, is that while fantasy may be the most popular, it does include settings for the following genres: fantasy, western, sci-fi, modern, east Asian. This allows you to cover a wide swath of characters that outside of boutique companies, are rarely covered.
My friend ordered several of these. Some of them directly for character's he's playing in a Dungeons and Dragons 5th edition campaign and others because he thought the ability to mod your figure awesome.
The miniatures were well packed and arrived sound and secure in a box with bubble wrap. Each figure was individual wrapped and no figures suffered damage in the transit.
In terms of the size compared to other companies?
In the first, we have a dwarf from Stonehaven miniatures next to an elf from Hero Forge.
In the second, we have a crouching human next to a miniature from Wyrd, an old metal Guild Captain.
Here are my observations from painting several of them:
1. Size is fairly close to standard in the industry. As much as there is a standard.
2. Detail is soft. I'd say somewhere around a fair Mage Knight or other prepainted miniature. The more control you have over your brush, the more you'll be able to bring out those details. Some of that detail is so soft though, that you will not be doing things like drybrushing unless you have fantastic control. The same is true for washes. Without deep recesses, the wash has nowhere to go. Note this varies depending on the model. In the below, the tabards don't necessarily have a lot of detail. The cloaks have enough to make it easier with washes, layering or drybrushing.
3. Printing Artifacts: If you were to hold one of the figures and look at it under a strong light, you would see the remanents of how the pieces are created. This looks like waved texture. It's so slight though that it does not show up when brushed. Some may want to file it but that seems a bit extreme.
4. Fragile to a point. I have several miniatures from Gale Force 9 for their Dungeons and Dragons line. Perhaps due to how the dynamic poses are set, I've broken a few of them. I dropped a knight from my friend's order and snapped the blade right off. The good news is that it was a clean break and easy to repair with super glue. Now mind you, that would probably happen with metal as well. Handle with the same care you do resin figures and you should be okay.
5. Paint Adhesion: I tended to use two spray coats of Army Painter. I started with black and then over the knights, plate mail. On the wizard and warrior, I did a zenith primer of white over the black. Despite that, there were several spots on the miniature that did not take paint easily. Note this was after I washed them in warm soapy water and used a toothbrush to scrub them.
The initial offering is strong. The biggest hurdle for casual users like myself, is price. At $25 a figure, these miniatures are directly competing with top tier brands on a per figure. On something inexpensive like Bones or a set of plastic? If you have a specific figure you want created, such as my friend did with a duelist with two rapiers and a crown, the price is worth it.
Is you just want something to paint? There are a lot of options at that price point.
As Hero Forge expands it's utility, not even necessarily in terms of detail, but in terms of variety, the value will increase. For example, if there comes a point where you can select from twenty different historical styled helmets or different types of clothing representing specific eras, people will pay more for that.
As more options in the positioning of the figures is increased, people may find something that gives them a better match. The ability to have a miniature using a two-handed axe in two hands for example.
The more specific your character need, the more specific the miniature you want, the stronger the appeal of Hero Forge.
Keep an eye out on them. It won't be long before I suspect Hero Forge will make it's money selling you the CAD's for printing at home.
Tuesday, April 7, 2015
How To Paint Citadel Miniatures

I'm a sucker for painting guides. I figure at the very least, I will have some nice photographs that I can use as inspiration for my own painting, or in the case of miniatures I'm painting just to fill out hordes, a paint by numbers guide so to speak.
Games Workshop, perhaps the largest hobby entity for fantasy and science fiction wargaming, often gets berated for a variety of reasons.
One of those reasons should not be making things too difficult to enter the hobby.
Now too expensive on the other hand...
The How To Pain Citadel Miniatures is a spiral bound book with the ability toe sit the book directly standing so that you can keep the book open directly while painting. This is an innovation that no other painting book has.
The book is loaded with numerous photographs of the different ranges that Games Workshop is known for: Warhammer, Warhammer 40K, and Lord of the Rings.
The art is clear and easy to follow along.
The information is easy to read and easy to follow along.
The book includes a DVD that repeats the information in the book, but with narration and someone actually performing the activity.
The use of this book is clear for individuals who are interested in the Games Workshop version of the hobby.
This isn't to say that someone new to painting miniatures won't learn.
The start of the book starts before even touching a model. This includes having the right tools and a good place to work that is both comfortable and well lit.
In terms of the models, it covers preparing the models. This includes removing product from frames, cleaning them with blades, repair work if necessary with liquid green stuff, as well as assembly with glue. Very simple, standard stuff that is good to have said regardless of who says it.
One of my favorite bits, is using a 'painting stick' with double sided tape used to hold miniatures that are then spray primed. A quick easy way to handle the priming method.
It includes a detailed breakdown of what the different pants, at the time of the writing, are.
Base Paints: High concentration of pigment allows a good base coverage. The base paint provides a foundation for future work. Not that long ago, these would have been part of the Foundation Line, a game line of paint in direct response to the excellent Privateer Press Paints.
Layer: Paint stacked atop the base paints that are meant to bring out the color of a model.
Drybrush: A new paint that I'm not aware of any other company using yet. It is thick paint that is easy to prepare for drybrushing and is easy to use.
Many of the standards for painting miniatures are here. This includes thinning you pant and using multiple thin coats to get a thicker, richer color, then just using one thick layer which may obscure details. These bits are good advice for almost any pant set from any company for any painter.
Shades: The shades are washes that darken the color they are put on. You can achieve some interesting effects by using colors that might not normally go together. One example is Reikland Fleshshade over Steel Legion Drab followed by Tallarn Sand and Karak Stone and Terminous Stone to achieve a Kahaki color.
Glazes: Different than shades, the glazes are thin color that generally have two purposes. One is to cut down 'glare' from highlights taken too far. The second is to tint the color to whatever you're glazing it to. One of the examples is using the different glazes over silver painted chaos warriors to show their particular devotion to one of the four ruinous powers. For example, green for Nurgle or Red for Khorne.
Texture: Mud in a bottle! You slop this onto the base and it has enough material in it to present some texture that can be washed and drybrushed for a quick nice looking base without too much work.
After discussing the different types of paint, and how to use them, the book breaks into the basics of painting, layering, drybrushing, washing, and using those techniques together. Since many of the paints are designed specifically to do one of the things, it works well.
To provide further examples, the book includes eight different groups of characters painted using the methods provided: Tyranids, Harad, Space Marines, Gondor, Orcs & Goblins, The Empire, Tomb Kings and Dark Eldar.
This is an excellent visual reference for anyone wondering how to paint one of those particular figures. For example, the Tomb Kings are given a rich coloration in gold and purple. The men on Gondor painted in this example, could be useful for Wood Elf Waywatchers.
The book closes out with a color guide taking different types of colors through the range. Perfect for sticking with an established pattern throughout an army. For example, if you want to do Space Wolves, you follow the guide for the following.
Basecoat: The Fang
Wash: Nuln Oil
Layer: Russ Grey
Layer: Fernisian Grey
Drybrush: Etherium Blue.
In some gases there are up to six steps as the final step is a glaze to mute an edge highlight.
Not covered in this volume, are the technical paints that came out after the book was done, nor the edge highlighting paints, which are based in color, on the drybrush paints, which are meant for a final highlight.
In addition to the book, the DVD covers almost everything the book does. This allows you to follow along in terms of cleaning, assembly, and painting of miniatures. The DVD clocks in at just slightly over 130 minutes.
Let me be clear. After reading the book and watching the video, you will probably not be winning any Golden Demon awards.
You will know how to assemble miniatures.
You will know how to base coat.
You will know how to layer.
You will know how to base.
You will know what the specific Citadel Paints are and how they work: Wash, Glaze, Drybrush, Texture.
You will have an idea of how to place highlighting specific to the Games Workshop paint range and have a lot of options for how to do that.
While Games Workshop may be hated in many circles, this is a great product for someone fresh to the hobby who wants an all in one introduction.
<iframe style="width:120px;height:240px;" marginwidth="0" marginheight="0" scrolling="no" frameborder="0" src="//ws-na.amazon-adsystem.com/widgets/q?ServiceVersion=20070822&OneJS=1&Operation=GetAdHtml&MarketPlace=US&source=ac&ref=qf_sp_asin_til&ad_type=product_link&tracking_id=modappn-20&marketplace=amazon®ion=US&placement=1907964894&asins=1907964894&linkId=WEHCF5WT5SWRF5YS&show_border=true&link_opens_in_new_window=true">
</iframe>
Thursday, April 2, 2015
Figopedia: Light & Colour - Theory and Practice
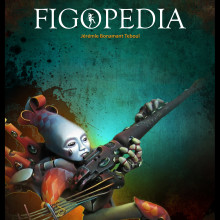
Figopedia Volume 1: Light & Color – Theory & Practice
Written by Jeremie Bonamant Teboul (JBT)
120 full color pages
One of the nice things about this internet era of things, is
that you can get a taste for how something may work. For example, prior to the
book launch of Figopedia, there was a Youtube video. It
provided a great overview of what was going to happen on Indigogo.
The campaign was well run. The updates were on a regular
basis. The stretch goals were modest and met. Part of that included some lady
adventurers that would be NSFW cast in resin with very fine detail on them.
The communication after the campaign were well done. The
books weren’t shipped out on time. There was some item, I’m not sure if it was
stickers or something, but that held things up.
Only briefly.
Biggest problem? The way it was shipped. My book had numerous
scuff marks on it and I was fortunate that the miniatures were still in the
package because the package was ripped open at the top due to a tear. It was a
big envelope basically as opposed to a box. Bad shipping on that. Good news the
minis look okay.
The book itself? Gorgeous. People talk about food porn all
the time. This is miniature porn. If you like looking at well painting miniatures,
this book is right up your alley. The miniatures are identified in both scale
and company. For example, there are many from Figione but there are others from
companies including Games Workshop. The painting on the cover? That’s a
modified Games Workshop Eldar walker.
The book is not a step by step in that the author doesn’t
grab one figure, prime it, put a color on, tell you the color, shade it, tell you
the color of the shade, and so on.
Rather, he provides ideas on how color works. It’s a bit
technical in some areas but the biggest thing I got from me, is to push the
paints further then you might normally. He does this by providing information
on the different parts of light and color.
For example, how does light fall on the miniature? Is it
falling from an angle? Is it all around light? Is it directly overhead? Each
way that light is cast provides it’s own highlight and shadows and must be
followed throughout the whole miniature as such.
Another aspect cover, is how light hits different shapes.
Large flat shapes versus folded cloth for example.
In terms of idea, he hits the following: Hue, lightness and
saturation.
He does this by discussing how to make colors ‘cool’ or ‘warm’
and how to harmonize them.
He does this by showing how to take the opposite color to
darken a color while retaining a richer color. For example, to get a deep rich
red, add green. I’ve seen the advice before but there are more examples here
and it’s clearly demonstrated.
One of the nice things, is that while there are is no single
walk through, he uses the same model to discuss different aspects several times
so you get to see how each of the theories applies to the same figure with
vastly different results. Want to see how the figure looks when it’s ‘cool’ or ‘warm’?
It’s there. Want to see it when the painter has harmonized it? Done.
In this way, the making the reader think about how the
figures are painted, not just the use color a, color b, color c, it is more of
a workbook for the reader. It’s more of a “here’s WHY you paint it this way as
opposed to just paint it with these colors.” For some people, that’s a good
thing. After all, what if he used Citadel paints and all you have are Vallejo’s?
No, instead, it’s take this red, darken it with green,
lighten it with yellow, pay attention to where the light is falling, how the
light is falling, how much light is falling, and don’t be afraid to have
extreme highlights and extreme shadows but only in those spaces where they are
needed and no further.
It’s not an inexpensive book. It’s overall value may depend
entirely on what you bring to the reading. But even if you just read it for the
art and the ideas, you may be motivated by the miniature porn to push your own
painting skills a little higher while motivated to do so. For me, it was a
worthwhile purchase and I will be supporting any future books done in this
manner, although with more feedback to the author to ship in a box or better
padding.
Those interest in the book and it’s website can go here.
Wednesday, April 1, 2015
Review: Reaper Bones Zombies (5 from Kickstarter 2)
As a backer of the second Reaper Bones Kickstarter, I've been going through my pledge. Some monsters that I don't think there are enough of, are zombies.
Games Workshop, for many of their army lines, have great generic figures. Their zombies are terrible. Mantic on the other hand, has some great zombies but you might not need that many in a horde.
Thankfully Reaper is here with some zombies.

These zombies have been primer with the Army Painter Necrotic Flesh. It provides a nice solid cover. Almost too nice! It'll bleed through paint placed on it and might require multiple coats. The good news is that it goes over the Bones material with no muss and no fuss. I used a hair dryer to quickly dry it off and get painted.
<iframe style="width:120px;height:240px;" marginwidth="0" marginheight="0" scrolling="no" frameborder="0" src="//ws-na.amazon-adsystem.com/widgets/q?ServiceVersion=20070822&OneJS=1&Operation=GetAdHtml&MarketPlace=US&source=ac&ref=qf_sp_asin_til&ad_type=product_link&tracking_id=modappn-20&marketplace=amazon®ion=US&placement=B005C3CZTY&asins=B005C3CZTY&linkId=JHTQ2CRLJVAVO37B&show_border=true&link_opens_in_new_window=true">
</iframe>
I decided for humour sake more than anything, that I was going to paint these using the Zombicide Paints. There are three sets. The paints are a little odd. They require thinning and a gentle hand when getting paint from the stopper. It's like you put pressure on and nothing, nothing, nothing, and bam, a huge blob of paint that you have to scoop back into the bottle.
Another reason I wanted to use the zombicide paints on zombies? Keep it to a limited pallette.
<iframe style="width:120px;height:240px;" marginwidth="0" marginheight="0" scrolling="no" frameborder="0" src="//ws-na.amazon-adsystem.com/widgets/q?ServiceVersion=20070822&OneJS=1&Operation=GetAdHtml&MarketPlace=US&source=ac&ref=qf_sp_asin_til&ad_type=product_link&tracking_id=modappn-20&marketplace=amazon®ion=US&placement=B00N2LFVPS&asins=B00N2LFVPS&linkId=3BFKSIOCSDHAY3DG&show_border=true&link_opens_in_new_window=true">
</iframe><iframe style="width:120px;height:240px;" marginwidth="0" marginheight="0" scrolling="no" frameborder="0" src="//ws-na.amazon-adsystem.com/widgets/q?ServiceVersion=20070822&OneJS=1&Operation=GetAdHtml&MarketPlace=US&source=ac&ref=qf_sp_asin_til&ad_type=product_link&tracking_id=modappn-20&marketplace=amazon®ion=US&placement=B00NB1EOIE&asins=B00NB1EOIE&linkId=CWUXPOEWCLBHUTIM&show_border=true&link_opens_in_new_window=true">
</iframe><iframe style="width:120px;height:240px;" marginwidth="0" marginheight="0" scrolling="no" frameborder="0" src="//ws-na.amazon-adsystem.com/widgets/q?ServiceVersion=20070822&OneJS=1&Operation=GetAdHtml&MarketPlace=US&source=ac&ref=qf_sp_asin_til&ad_type=product_link&tracking_id=modappn-20&marketplace=amazon®ion=US&placement=B00T9SEJBA&asins=B00T9SEJBA&linkId=YOC5I4IQZOEYIWSM&show_border=true&link_opens_in_new_window=true">
</iframe>
The first thing I did was use a 'toxic shader' to try and force myself to view the details on the figures. The toxic shader was thinned with a little standard Liquitex acrylic thinner. I was surprised by how purple the color was.

Seeing some of the details, I made a few mental notes. In most cases, it was a layer back onto the base color and then a layer mixed with another lighter color to bring out some more details. At the end I decided why not and used the glistening blood effect. It's a neat little paint. It's semi-transparent and gets a nice effect.

I apologize for the quality of the photos. My bad is shot and I'm painting while lying down which means I don't have access to better light and well, I was never good with taking photos in the first place.
The zombies are a nice group. The shuffling gait they have is well captured. The turned in feet for example, are a nice touch. The crouching lurking vibe? Solid.
The only thing I would like to see more of, are well, wounds and perhaps trophies. The only one I saw with a wound was the young lady and that's on her neck and appears to be from a straight cut.
Overall I'd say most of these can fit into almost any campaign setting and are a solid buy for someone looking to bulk out their zombies.
Games Workshop, for many of their army lines, have great generic figures. Their zombies are terrible. Mantic on the other hand, has some great zombies but you might not need that many in a horde.
Thankfully Reaper is here with some zombies.
These zombies have been primer with the Army Painter Necrotic Flesh. It provides a nice solid cover. Almost too nice! It'll bleed through paint placed on it and might require multiple coats. The good news is that it goes over the Bones material with no muss and no fuss. I used a hair dryer to quickly dry it off and get painted.
<iframe style="width:120px;height:240px;" marginwidth="0" marginheight="0" scrolling="no" frameborder="0" src="//ws-na.amazon-adsystem.com/widgets/q?ServiceVersion=20070822&OneJS=1&Operation=GetAdHtml&MarketPlace=US&source=ac&ref=qf_sp_asin_til&ad_type=product_link&tracking_id=modappn-20&marketplace=amazon®ion=US&placement=B005C3CZTY&asins=B005C3CZTY&linkId=JHTQ2CRLJVAVO37B&show_border=true&link_opens_in_new_window=true">
</iframe>
I decided for humour sake more than anything, that I was going to paint these using the Zombicide Paints. There are three sets. The paints are a little odd. They require thinning and a gentle hand when getting paint from the stopper. It's like you put pressure on and nothing, nothing, nothing, and bam, a huge blob of paint that you have to scoop back into the bottle.
Another reason I wanted to use the zombicide paints on zombies? Keep it to a limited pallette.
<iframe style="width:120px;height:240px;" marginwidth="0" marginheight="0" scrolling="no" frameborder="0" src="//ws-na.amazon-adsystem.com/widgets/q?ServiceVersion=20070822&OneJS=1&Operation=GetAdHtml&MarketPlace=US&source=ac&ref=qf_sp_asin_til&ad_type=product_link&tracking_id=modappn-20&marketplace=amazon®ion=US&placement=B00N2LFVPS&asins=B00N2LFVPS&linkId=3BFKSIOCSDHAY3DG&show_border=true&link_opens_in_new_window=true">
</iframe><iframe style="width:120px;height:240px;" marginwidth="0" marginheight="0" scrolling="no" frameborder="0" src="//ws-na.amazon-adsystem.com/widgets/q?ServiceVersion=20070822&OneJS=1&Operation=GetAdHtml&MarketPlace=US&source=ac&ref=qf_sp_asin_til&ad_type=product_link&tracking_id=modappn-20&marketplace=amazon®ion=US&placement=B00NB1EOIE&asins=B00NB1EOIE&linkId=CWUXPOEWCLBHUTIM&show_border=true&link_opens_in_new_window=true">
</iframe><iframe style="width:120px;height:240px;" marginwidth="0" marginheight="0" scrolling="no" frameborder="0" src="//ws-na.amazon-adsystem.com/widgets/q?ServiceVersion=20070822&OneJS=1&Operation=GetAdHtml&MarketPlace=US&source=ac&ref=qf_sp_asin_til&ad_type=product_link&tracking_id=modappn-20&marketplace=amazon®ion=US&placement=B00T9SEJBA&asins=B00T9SEJBA&linkId=YOC5I4IQZOEYIWSM&show_border=true&link_opens_in_new_window=true">
</iframe>
The first thing I did was use a 'toxic shader' to try and force myself to view the details on the figures. The toxic shader was thinned with a little standard Liquitex acrylic thinner. I was surprised by how purple the color was.
Seeing some of the details, I made a few mental notes. In most cases, it was a layer back onto the base color and then a layer mixed with another lighter color to bring out some more details. At the end I decided why not and used the glistening blood effect. It's a neat little paint. It's semi-transparent and gets a nice effect.
I apologize for the quality of the photos. My bad is shot and I'm painting while lying down which means I don't have access to better light and well, I was never good with taking photos in the first place.
The zombies are a nice group. The shuffling gait they have is well captured. The turned in feet for example, are a nice touch. The crouching lurking vibe? Solid.
The only thing I would like to see more of, are well, wounds and perhaps trophies. The only one I saw with a wound was the young lady and that's on her neck and appears to be from a straight cut.
Overall I'd say most of these can fit into almost any campaign setting and are a solid buy for someone looking to bulk out their zombies.
Monday, March 30, 2015
Review: 77239: Skeleton Guardian Spearman from Reaper Miniatures
I was briefly at AdeptiCon this year. I went to check out the vendor hall. Several companies, including Scale 75 and Games and Gear, were there. , I wanted to save myself shipping and handling charges as I order their products through +RK Berry .
Reaper Miniatures was also in presence. I backed their Bones 2 Kickstarter and received my figures. I noticed that I made a mistake on my order, and have been trying to work with Reaper to correct that issue.
Because of that error, I did not have all of the new figures produced for the Kickstarter. So while at AdeptiCon, I picked up several packs of the skeletons.
Skeletons are one of those miniatures where I can always use them. You can paint them up in different styles to represent different fallen Empires or paint the bones themselves different colors to represent different types of monsters.
 This guy comes in a nice three pack. That's a link to the Reaper image itself.
The figures are tall, long boned. There are some mold lines and the Bones material is a little more difficult to remove if you're not careful. I say this because there isn't a lot of resistance to the material. Push to hard and you'll cut right through it.
I didn't bother. They were for table top play so my worry was minimized.
The details are a little soft. This is most noticeable on the edges of the spear and around the shield itself.
The figures are also 'bendy'. In pictures to follow, you'll note that it's the same figure, but the stance is slightly off on each. I used a lot of hot water to get the spears into something resembling 'normal' and could probably have done more work on that later.
The good news is that the material is soft. If you want to do conversions with bits, especially Games Workshop, that tends to provide overage of such? You won't have any problems. I wouldn't recommend anything metal though unless you're going to have that weapon in a downward position.
For me, the good news is that they have what I'll call 'Old School' aesthetic. A belt, but not dozens of belt pouches. A buckle, but not dozens of bands. A weapon, but not covered in chains or other miscellany.
I primed it with Games Workshop Imperial Brush on Primer. Did not have great results. The bottle wasn't mixed enough despite much shaking. I glued them onto the round bases that I received with the Reaper Kickstarter.
Not too sure about that. These figures are 'tall' and the bases added a lot of height. In addition, I have this far away dream of one day using my figures in Reaper's skirmish game Warlord, and they use square bases. Still, the price was so inexpensive if I want more I should be able to afford it.
I then mounted them on some blocks with blue tack. I don't have to touch them that way and there is less chance of rub off. Because I have the Games Workshop complete miniature paint case (or at least the last one before the Technical Paints and the Hard Edging Paints came out) and bending is a problem due to back issues, I find the Games Workshop case easy to access so used them with one exception, an Army Painter shader.
For these I tend to go with 'layering'.
1. Mid Tone: Something that isn't the brightest or darkest color I'll be using for the part in question.
2. Shade:Often I'll use a wash to darken parts of the figure.
3. Layer: One or more layers that are progressively lighter and occupy less space on the miniature.

Bone: Zandri Dust
Clothes: Steel Legion Drab
Spear: Dryad Bark.
Metals: Boltgun metal. (For some reason I have a lot of the old metallic range.)
Leather: Mournfang Brown
Base: Charadon Granite (this bottle will soon fade from the world, one of my few remaining Foundation GW paints)

Bones: Army Painter Soft wash.
Clothes: Reikland Fleshshade
Spears: Agrax Earthshade
Metals: Nuln Oil
Leather: Agrax Earthshade
Base: None

Bones: Highlight 1 Ushabti Bone, Highlight 2 Screaming Skull
Clothes: Highlight 1 Tallarn Sand, Highlight 2 Kraak Stone
Spears: Highlight 1 Gorthor Brown, Highlight 2 Baneblade Brown
Metals: Highlight 1 Ironbreaker. Highlight 2 Runefang Steel.
Leather: Highlight 1 Skrag Brown, Highlight 2 Deathclaw Brown
Base:Highlight 1 Dawnstone, , Highlight 2 Terminus Stone
Due to their 'clean' nature and lack of various pieces of bric-abrac, these were a quick paint job. If I wasn't having some health related problems, I could probably have knocked this out in under an hour. I might also have went with some more highlights and might have tried to age the metals a bit more.
The Skeleton Guardians weren't available from the Reaper's webstore last I looked, but was available to view here.
Is there something else you'd like to see mentioned in future reviews? A scale shot with the figure next to other figures? More WIP? Different style of paint jobs? I know the camera work leaves much to be desired so if you have a site with some good tutorials, lay it on me.
<iframe style="width:120px;height:240px;" marginwidth="0" marginheight="0" scrolling="no" frameborder="0" src="//ws-na.amazon-adsystem.com/widgets/q?ServiceVersion=20070822&OneJS=1&Operation=GetAdHtml&MarketPlace=US&source=ac&ref=qf_sp_asin_til&ad_type=product_link&tracking_id=modappn-20&marketplace=amazon®ion=US&placement=B007XZNPWA&asins=B007XZNPWA&linkId=AI56IOKKEAW2BIKK&show_border=true&link_opens_in_new_window=true">
</iframe><iframe style="width:120px;height:240px;" marginwidth="0" marginheight="0" scrolling="no" frameborder="0" src="//ws-na.amazon-adsystem.com/widgets/q?ServiceVersion=20070822&OneJS=1&Operation=GetAdHtml&MarketPlace=US&source=ac&ref=qf_sp_asin_til&ad_type=product_link&tracking_id=modappn-20&marketplace=amazon®ion=US&placement=B00KOCRTT4&asins=B00KOCRTT4&linkId=EJW36AVSYWRWIVU6&show_border=true&link_opens_in_new_window=true">
</iframe>
Reaper Miniatures was also in presence. I backed their Bones 2 Kickstarter and received my figures. I noticed that I made a mistake on my order, and have been trying to work with Reaper to correct that issue.
Because of that error, I did not have all of the new figures produced for the Kickstarter. So while at AdeptiCon, I picked up several packs of the skeletons.
Skeletons are one of those miniatures where I can always use them. You can paint them up in different styles to represent different fallen Empires or paint the bones themselves different colors to represent different types of monsters.
The figures are tall, long boned. There are some mold lines and the Bones material is a little more difficult to remove if you're not careful. I say this because there isn't a lot of resistance to the material. Push to hard and you'll cut right through it.
I didn't bother. They were for table top play so my worry was minimized.
The details are a little soft. This is most noticeable on the edges of the spear and around the shield itself.
The figures are also 'bendy'. In pictures to follow, you'll note that it's the same figure, but the stance is slightly off on each. I used a lot of hot water to get the spears into something resembling 'normal' and could probably have done more work on that later.
The good news is that the material is soft. If you want to do conversions with bits, especially Games Workshop, that tends to provide overage of such? You won't have any problems. I wouldn't recommend anything metal though unless you're going to have that weapon in a downward position.
For me, the good news is that they have what I'll call 'Old School' aesthetic. A belt, but not dozens of belt pouches. A buckle, but not dozens of bands. A weapon, but not covered in chains or other miscellany.
I primed it with Games Workshop Imperial Brush on Primer. Did not have great results. The bottle wasn't mixed enough despite much shaking. I glued them onto the round bases that I received with the Reaper Kickstarter.
Not too sure about that. These figures are 'tall' and the bases added a lot of height. In addition, I have this far away dream of one day using my figures in Reaper's skirmish game Warlord, and they use square bases. Still, the price was so inexpensive if I want more I should be able to afford it.
I then mounted them on some blocks with blue tack. I don't have to touch them that way and there is less chance of rub off. Because I have the Games Workshop complete miniature paint case (or at least the last one before the Technical Paints and the Hard Edging Paints came out) and bending is a problem due to back issues, I find the Games Workshop case easy to access so used them with one exception, an Army Painter shader.
For these I tend to go with 'layering'.
1. Mid Tone: Something that isn't the brightest or darkest color I'll be using for the part in question.
2. Shade:Often I'll use a wash to darken parts of the figure.
3. Layer: One or more layers that are progressively lighter and occupy less space on the miniature.
Bone: Zandri Dust
Clothes: Steel Legion Drab
Spear: Dryad Bark.
Metals: Boltgun metal. (For some reason I have a lot of the old metallic range.)
Leather: Mournfang Brown
Base: Charadon Granite (this bottle will soon fade from the world, one of my few remaining Foundation GW paints)
Bones: Army Painter Soft wash.
Clothes: Reikland Fleshshade
Spears: Agrax Earthshade
Metals: Nuln Oil
Leather: Agrax Earthshade
Base: None
Bones: Highlight 1 Ushabti Bone, Highlight 2 Screaming Skull
Clothes: Highlight 1 Tallarn Sand, Highlight 2 Kraak Stone
Spears: Highlight 1 Gorthor Brown, Highlight 2 Baneblade Brown
Metals: Highlight 1 Ironbreaker. Highlight 2 Runefang Steel.
Leather: Highlight 1 Skrag Brown, Highlight 2 Deathclaw Brown
Base:Highlight 1 Dawnstone, , Highlight 2 Terminus Stone
Due to their 'clean' nature and lack of various pieces of bric-abrac, these were a quick paint job. If I wasn't having some health related problems, I could probably have knocked this out in under an hour. I might also have went with some more highlights and might have tried to age the metals a bit more.
The Skeleton Guardians weren't available from the Reaper's webstore last I looked, but was available to view here.
Is there something else you'd like to see mentioned in future reviews? A scale shot with the figure next to other figures? More WIP? Different style of paint jobs? I know the camera work leaves much to be desired so if you have a site with some good tutorials, lay it on me.
<iframe style="width:120px;height:240px;" marginwidth="0" marginheight="0" scrolling="no" frameborder="0" src="//ws-na.amazon-adsystem.com/widgets/q?ServiceVersion=20070822&OneJS=1&Operation=GetAdHtml&MarketPlace=US&source=ac&ref=qf_sp_asin_til&ad_type=product_link&tracking_id=modappn-20&marketplace=amazon®ion=US&placement=B007XZNPWA&asins=B007XZNPWA&linkId=AI56IOKKEAW2BIKK&show_border=true&link_opens_in_new_window=true">
</iframe><iframe style="width:120px;height:240px;" marginwidth="0" marginheight="0" scrolling="no" frameborder="0" src="//ws-na.amazon-adsystem.com/widgets/q?ServiceVersion=20070822&OneJS=1&Operation=GetAdHtml&MarketPlace=US&source=ac&ref=qf_sp_asin_til&ad_type=product_link&tracking_id=modappn-20&marketplace=amazon®ion=US&placement=B00KOCRTT4&asins=B00KOCRTT4&linkId=EJW36AVSYWRWIVU6&show_border=true&link_opens_in_new_window=true">
</iframe>
Saturday, January 18, 2014
Reaper Dragons: Shadow and Wood


Middle picture is just a scale shot. The shadow dragon stands well above 28mm while the Green is a little under, but wings may make it up that far. The dwarf is another Reaper Bones minaiture.
The last one is actually a metal miniature. He required a little prep work as you have to glue his arms and wings into the base. I also threw him onto a round lip stand because I thought he could use the support thanks to the wings and arms going on. Assembly was fairly easy and didn't require any green stuff but I'm sure I could have added some.
Glad to see Reaper making metal miniatures again. I have a few others that I'm getting ready to work on in various stages of prep but that gets back to the whole problem of having too many miniatures from backing several kickstarters at once and then several of them showing up at one time. It's a good problem to have mind you but sometimes I feel a little indecisive about what I should be working on.
For example, I've got a few lizard men in various stages of completion. These are more Bones figures from the Reaper kickstarter that I'm not actually doing anything with but just had them out when I was painting some other green stuff or priming stuff. I need to figure out my gaming priority as January is half over and I'm still flipping back and forth between different sets of miniatures.
Anyone else have that problem? You backed a kickstarter, like Drake for example, and are like, "Man, I'm going to paint all the dragons!" and it shows up and your like, "Later. I'm going to paint all the dragons later."
Subscribe to:
Posts (Atom)